Knee pain is one of the most frustrating barriers to movement, it impacts everything from climbing stairs to simply getting out of a chair. If you are here, you are likely looking for a way to stop the pain, and you’ve heard that “Wall Sits” might be the answer.
You’re right! but there is a catch.
Too often, we treat the knee as the source of the problem, when in reality, it is often just the messenger.
It is the joint caught in the middle, forced to compensate for a stiff ankle below or weak glutes above.
While the Wall Sit is one of the most effective tools for immediate pain relief, it is only the first step.
To truly “beat” knee pain for the long term, we have to look at the whole leg, not just the knee joint itself.
In this guide, we aren’t just going to look at the how, we are going to look at the why, the lifestyle habits that support healing, and the long-term plan to make your knees resilient again.
The Anatomy of the Issue: Why Your Knee Needs Help
To understand why the wall sit is so effective, we first have to understand the nature of your knee pain.
Most common knee pain, especially pain felt when walking down stairs or sitting for long periods, is patellofemoral pain.
In simple terms, this means the kneecap isn’t tracking smoothly as it glides over your thigh bone.
The Power of Isometrics
The wall sit is an isometric exercise. This means your muscles are under tension, but the joint itself isn’t moving.
This is crucial for two reasons:
Reduced Friction: By keeping the knee joint still, you avoid the “grinding” sensation that occurs during repetitive bending and straightening. You get all the benefits of strengthening the quadriceps without the irritation that comes from joint movement.
Pain Inhibition: Research shows that isometric holds can trigger an “analgesic effect” (pain relief) in the nervous system. By forcing the quadriceps to work in a static position, we can actually “turn down the volume” on the pain signals coming from the knee.
The Joint Chain: It’s Rarely Just the Knee
Even though your knee is where you feel the pain, it is rarely the only culprit. Think of your leg as a chain:
The Hips (The Control Center): If your glutes are weak, your thigh bone tends to rotate inward. This forces your knee to twist, which strains the soft tissues.
The Ankles (The Shock Absorbers): If your ankles are stiff, your knee has to work harder to compensate during movement.
By performing a wall sit, you are training your quadriceps to stabilize the knee, but you are also forcing the hips and ankles to work together in a functional alignment.
You aren’t just “strengthening a muscle”, you are retraining a movement pattern.
Who would benefit from would wall sits, otherwise known as wall squats?
Those wanting to avoid or prepare for knee or hip surgery
Most with hip or knee arthritis will get massive benefit
Those of you that struggle to get up from chairs
Anyone at all who wants to strengthen their back and legs from home
The Prescription: How to Perform the Perfect Wall Sit
The beauty of the wall sit is its simplicity, but there is a big difference between “leaning against a wall” and “performing a therapeutic wall sit.” To get the pain-relieving benefits, your setup matters.
The Step-by-Step
The Setup: Stand with your back flat against a wall, feet about shoulder-width apart.
The Slide: Walk your feet out about 1–2 feet from the wall. Slowly slide your back down the wall until your knees are bent.
The Angle: Aim for a comfortable angle. You do not need to go to 90 degrees immediately. If you are in pain, start with a shallower angle (120 degrees). The pain relief happens even at higher angles, so don’t force depth if it hurts.
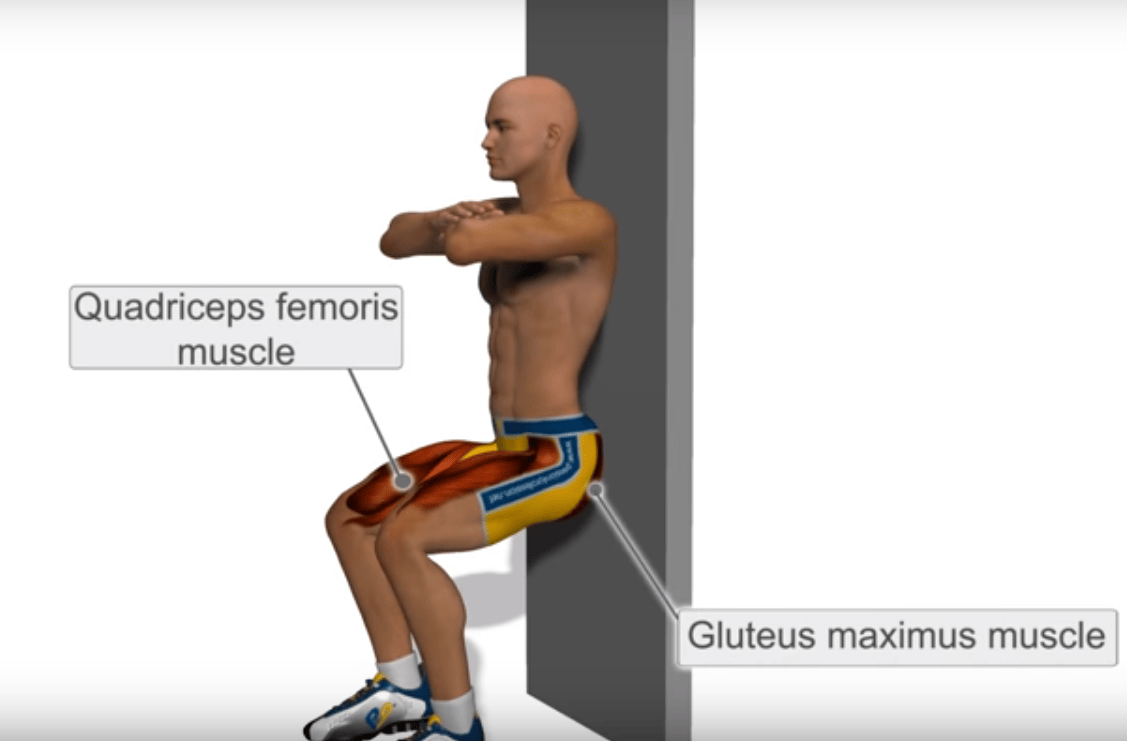
The Engagement: Press your lower back into the wall. Engage your core, and—most importantly—press your heels into the floor. You should feel your quadriceps (the muscles on the front of your thighs) “wake up” and begin to burn.
3 Mistakes to Avoid
If you aren’t feeling it in your quads, or if your knee pain increases, you might be falling into one of these common traps:
The “Knee-Load” Trap: If your feet are too close to the wall, your knees will jut out past your toes, which increases pressure on the joint. Fix: Slide your feet slightly further forward to shift the weight onto your heels.
The “Hands-on-Knees” Cheat: Resting your hands on your knees takes the load off your quads. Fix: Keep your hands at your sides, crossed over your chest, or resting on your thighs (without pushing down).
The “Depth Obsession”: Going too deep too soon can flare up an angry knee. Fix: Start high and hold for shorter durations. You can always increase depth as your tolerance improves.
The “Dosing” Strategy
Don’t aim for a 5-minute personal best on day one. Start with what you can tolerate:
The Hold: Aim for 20–30 seconds.
The Rest: Rest for 30–60 seconds.
The Reps: Perform 3–5 rounds.
If you feel sharp pain, stop immediately. The goal is muscle fatigue, not joint pain.
Top Tips and Considerations
It is simple a squat hold with your back leaning against the wall as shown in the video below. the key things to remember are:
Your knees should not go out past your toes. Aim to keep your knees over your ankles or feet
Keep your chest up and back straight
Do not push into pain
Expect some burning in your thigh muscles (this is a good pain and shows your muscles are working hard)
Top tip: Lean into the wall with a Swiss Ball, foam roller, basketball or anything that rolls to minimize friction – this makes the exercise far more effective and comfortable.
The idea for the wall sit is not to repetitively go up and down but squat down and hold for a period of time.
Aim to hold until your muscles start fatiguing and then come back up again and repeat 10 times – over time your hold time will get longer and longer and your back and legs will get stronger! (1)
Tip: Only go down as far as is comfortable for YOU and don’t go past horizontal thighs.
Progression – The Next Level
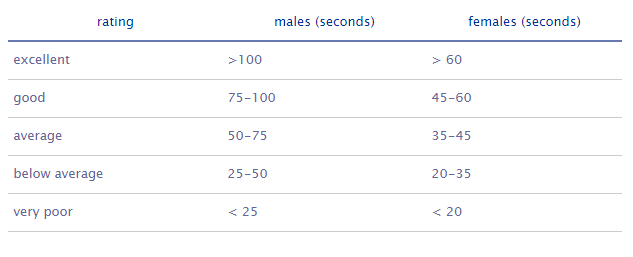
The one-leg wall squat is often used as a test of lower limb endurance(2,3) and also makes for an excellent exercise when you want to push your leg strength further while still looking after your knees.
All you need to do differently for the one leg hold is lower yourself down, keeping your feet shoulder width apart and then carefully lift one foot just off the ground – hold as long as you can (without losing form).
Below is a table giving average times to gauge where you are at:
The wall sit is a great exercise and well worth persevering with whether you can just hold a double leg wall sit for 20 seconds or a one leg squat for 100!
Make it a challenge every night for one month and notice the difference.
Building Resilience: The Holistic Recovery Plan
The wall sit is a powerful tool to calm your pain, but exercise is only one piece of the equation.
If you are training hard but ignoring your recovery, you are essentially trying to fill a bucket that has a hole in the bottom.
To beat knee pain for the long term, we need to create an internal environment where your tissues can actually heal.
Fueling Your Recovery: Your muscles and tendons don’t just magically repair themselves after a workout; they require specific building blocks.
Hydration: Your joint cartilage and synovial fluid (the joint’s natural lubricant) are heavily dependent on water. If you’re dehydrated, your joints are effectively running “dry.”
Protein for Repair: Muscle tissue repair is protein-dependent. Ensure you are getting adequate protein throughout the day to support the muscle gains you are chasing with your wall sits.
Anti-Inflammatory Basics: While we don’t need a radical diet overhaul, incorporating omega-3 fatty acids (found in fish oil, flaxseeds, or walnuts) and spices like turmeric can help manage systemic inflammation, taking the “heat” off your joints.
The Recovery Mindset
Sleep is Non-Negotiable: Most tissue repair and hormonal regulation for recovery happens during deep sleep. If you are chronically sleep-deprived, your body’s ability to recover from exercise is significantly reduced.
Activity Pacing: Don’t treat your pain like an “on/off” switch. Use the “Traffic Light” system:
Green: No pain. You are safe to increase activity or depth.
Yellow: Mild, manageable discomfort. This is okay, provided it settles down quickly after you finish.
Red: Sharp, stabbing pain or pain that causes you to limp. If you hit Red, stop. You need to dial back the intensity or duration until your knee adapts.
Your At-Home Toolkit: You don’t need expensive equipment to aid your recovery. Use these simple strategies to manage symptoms day-to-day:
The Temperature Protocol:
Ice: Use for 10–15 minutes after activity if your knee feels “hot,” swollen, or throbbing. It helps calm acute inflammation.
Heat: Use before your wall sits if your knee feels stiff or “rusty.” Heat helps increase blood flow and muscle elasticity, making the exercise more comfortable.
Footwear Check: Take a look at your shoes. Are they worn down on one side? If your shoes are uneven, they are forcing your foot—and consequently your knee—to compensate with every step. If they are worn out, they aren’t supporting you.
The Safety Net: When to Consult a Professional
While the Wall Sit is a safe, effective starting point for many, it is not a cure-all.
It is critical to distinguish between “rehab discomfort” (the productive soreness of building strength) and “injury pain” (your body’s warning light).
Learning the Difference: “Good” vs. “Bad” Pain
The “Good” Kind (Muscle Soreness): This is the feeling of muscle fatigue. It happens during or shortly after the exercise, feels like a dull ache or burn, and dissipates quickly once you stop the activity.
The “Bad” Kind (Sharp/Joint Pain): This feels like a sharp, stabbing, or grinding sensation inside the joint. If the pain causes you to limp, creates an immediate sensation of weakness, or persists long after you’ve stopped moving, stop the exercise immediately.
The “Red Flag” Checklist
If you experience any of the following, do not try to “tough it out.” These are signs that you may need a professional assessment, diagnostic imaging, or specialized manual therapy:
Mechanical Locking: If your knee literally gets “stuck” in one position and you have to wiggle it to get it to move again. This often suggests a meniscus or cartilage issue.
The “Give-Way” Feeling: If the knee feels unstable or like it is going to buckle underneath you, this can indicate ligamentous laxity or instability that requires professional testing.
Significant/Sudden Swelling: If your knee swells up like a balloon shortly after an injury, this requires an immediate check to rule out acute tears.
Night Pain: Pain that is constant and keeps you awake at night is often a sign of more serious inflammation or systemic issues and should not be managed with home exercises alone.
No Progress: If you have been consistent with these exercises for 4–6 weeks and you have seen zero improvement in your pain levels or function, it is time to have a professional look at the “why.”
How a Professional Helps
You might wonder: If a PT is just going to give me exercises, why not just do them myself? A professional does much more than prescribe exercises:
Differential Diagnosis: We rule out “red flags” (like fractures or severe tears) that self-guided programs might miss.
Movement Screenings: We can identify why your knee is hurting in the first place. Is it actually your hip? Is it a foot mechanics issue? We look at the entire kinetic chain to stop the pain from coming back.
Manual Therapy: Sometimes the joint or surrounding tissue needs a specific “nudge” or release that you cannot perform on yourself.
Strategic Programming: We can provide a progressive, periodized plan. When you stop “guessing” and start following a data-driven program, the recovery time is often significantly shorter.
Your Next Steps: Building a Resilient Knee
The wall sit is your starting line, not your finish line.
By integrating this exercise into your routine, you are taking the first step toward calming the symptoms and understanding how your knee functions.
But remember: the ultimate goal is not just to survive a 30-second hold—it is to build a knee that supports you through running, hiking, climbing stairs, and everything else you love to do.
The “PhysioPrescription” is a partnership.
Use this resource to take charge of your daily movement and build your at-home toolkit, but do not hesitate to reach out to a professional if your progress plateaus.
Sometimes, you just need a second pair of eyes to spot a compensation pattern that you can’t see yourself.
Ready to keep going?
Now that you’ve stabilized the knee with the wall sit, it’s time to build strength in the muscles that protect it. Continue your recovery journey by checking out these other guides: